
4 Ingredient Grinch Poop
This post may contain affiliate links. If you make a purchase after clicking a link, I may earn a small commission AT NO COST TO YOU. As an Amazon Affiliate, I earn from qualifying purchases.
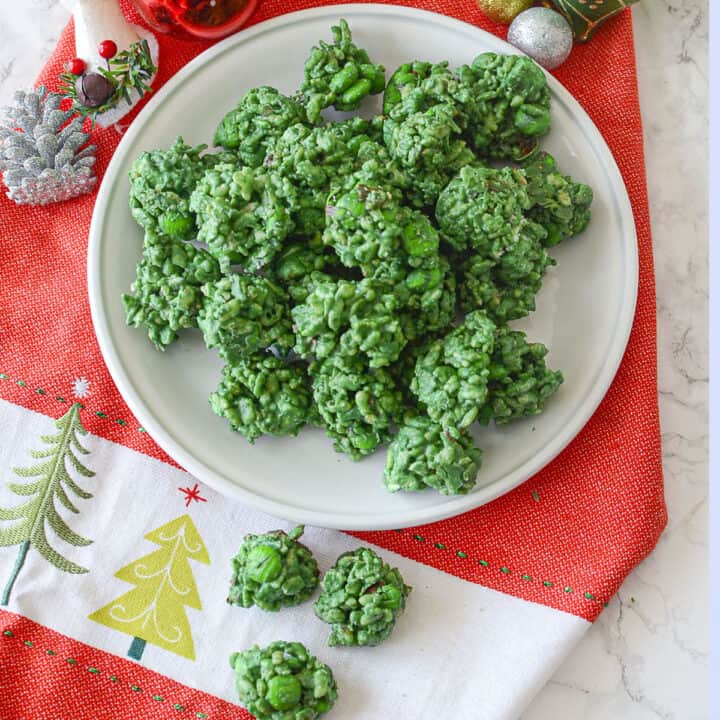
Grinch Poop is here to sprinkle some cheeky fun onto your holiday dessert table or for friendly gifting. With crispy rice cereal, green melting chocolate (or white chocolate with a little help from green food coloring), plus green M&M’s and mini marshmallows, these treats look suspiciously like something the Grinch might leave behind – but trust me, they’re just pure holiday cheer.
This funny themed recipe pairs perfectly with my Snowman Poop and Moose Poop recipes, which are not only delicious, but little ones get a huge kick out of them and it’s always fun to see those little smiles!

What You’ll Need For This Grinchy Goodness Recipe
- Rice cereal: Keeps things light and crispy. I’ve bought the store brand ‘rice krispies’ (not sponsored) and these Grinch treats work out fine.
- Green melting chocolate candy: I typically buy these from my local bulk ingredient store because they carry all the candy things you’d want to make edible treats. Another option is to buy these or If you can’t find these candy melts, another choice is to use white chocolate with food coloring.
- Green M&M’s: For that extra bit of Grinch spirit.
- Mini marshmallows: Soft, chewy, and perfect to add a “fluffy” touch.

Instructions For Making Naughty Little Plops
STEP ONE: Add the rice cereal, green chocolate candy and marshmallows in a large bowl.
STEP TWO: Melt the Chocolate: Slowly melt your green chocolate (or white chocolate with green food coloring) in the microwave in 30-second intervals until smooth.
Helpful tip: Don’t let it get too hot, or it’ll melt the M&Ms and marshmallows into an unintended holiday mush.


STEP THREE: Mix it up: Mix the chocolate into the rice mixture and combine them together until everything has the green chocolate well incorporated.

STEP FOUR: Scoop and Shape: Using a small cookie scoop, drop “plops” onto a parchment-lined baking sheet. If there are stray pieces of cereal, shape them back into the “plop”. Chill until firm.

Gift-Ready: Mound your hardened treats into sandwich bags, top with a cute label (coming soon!) for easy gifting.
**** Check the bottom of this post for a printable recipe card with all the exact ingredient amounts and directions to make this recipe perfect.
Make Ahead And Storage
- Make Ahead: This stuff stays crispy, so feel free to make it a few days before gifting.
- Storage: Store in an airtight container at room temperature for up to a week – if they last that long! I don’t recommend freezing them as they might attract moisture from the air during thawing and won’t maintain their crispiness.

Customizations For Grinch Poop Snacks
- Candy Switch-Up: Can’t find green M&Ms? Substitute with any small green candy or holiday sprinkles.
- Chocolate Options: If green chocolate isn’t handy, white chocolate with green food coloring does the trick!
- Extra Add-Ins: Crushed peppermint, mini marshmallows, shredded coconut, or red and white sprinkles for a festive touch.
- Nuts: You could add nuts like candied pecans or walnuts… and I’ll just leave it at that, haha.

Slap on a Label and Share the Laughs
For a super cute gift idea, I’ve provided a FREE printable label that you would attach (staple, tape, etc) to a ziplock bag that has the grinch poop inside.
Click HERE to print off a free page of PDF labels to print off for multiple gifting!

Sandwich bags with half-length labels let the Grinch treats peek through, adding to the fun. (P.S. When the label is ready, I’ll add a picture of what it looks like, and a link for you to grab it!)
Thanks so much for stopping by the blog today and I hope you have a fantastic day!
~Joanne
4 Ingredient Grinch Poop
Grinch Poop is a funny and adorable festive treat that's quick, easy, and perfect for holiday fun. These sweet little bites will add a pop of Grinchy green to your dessert spread. With a printable label for easy gifting, they’re a playful holiday treat everyone will love.
Ingredients
- 2 Cups Green Candy Melts
- 1 Cup Mini Marshmallows
- 1 Cup Green M&Ms or other green chocolate candy
- 3 Cups Rice cereal
Instructions
- Combine the Mix-Ins: Add the rice cereal, green chocolate candy, and mini marshmallows to a large bowl.
- Melt the Chocolate: Place the candy melts in a microwave-safe bowl and heat in 30-second intervals, stirring between each round, until smooth and fully melted. Helpful tip: Don’t overheat - hot chocolate will melt your M&Ms and marshmallows into one big festive blob.
- Mix It All Together: Pour the melted chocolate over the cereal mixture and stir until everything is evenly coated and bright Grinch-green.
- Scoop & Shape: Using a small cookie scoop, portion “plops” onto a parchment-lined baking sheet. If loose pieces fall off, gently reshape them back together.
- Chill: Refrigerate or let sit at room temperature until firm.
- Gift It: Pile the hardened treats into sandwich bags and finish with a cute label for hilarious holiday gifting.
Notes
Make Ahead Notes: These stay crispy! Make them 2–3 days ahead for stress-free gifting.
Storage Notes:
Store in an airtight container at room temperature for up to 1 week. Freezing isn’t recommended — thawing can introduce moisture and make them soft instead of crispy. Tip: When I make these, I like to mix half the chocolate into the cereal first, and give it a good mix. Then I'll add the remaining part of the chocolate. Work 'kinda' fast, but don't stir like crazy. You just want to have everything incorporated fairly quickly before the chocoate starts to set up.
Nutrition Information
Yield 40 Serving Size 1Amount Per Serving Calories 83Total Fat 1gSaturated Fat 1gTrans Fat 0gUnsaturated Fat 0gCholesterol 1mgSodium 20mgCarbohydrates 18gFiber 0gSugar 11gProtein 0g
All nutritional information is based on third party calculations and is only an estimate. Each recipe and nutritional value will vary depending on the brands used, measuring methods and portion sizes per household.
Your recipe card doesn’t have any instructions; only ingredients and notes.
Hi Amanda! You know, it’s so odd why the instructions weren’t there! I’ve replaced them in the recipe card, so I hope they stay there this time! Thank you so much for letting me know!